Installation
Simply place the plugin into the BBEdit Extensions folder and restart BBEdit. With BBEdit Lite version 4.1 BBEdit Extensions has been renamed BBEdit Plug-Ins.
Quick Start
Drag any of your robots onto BBEdit's Icon. Edit your robot, and choose Assemble from the Extensions menu to assemble it. With BBEdit Lite version 4.1 the Extensions menu has been renamed Tools.
Preferences Dialog
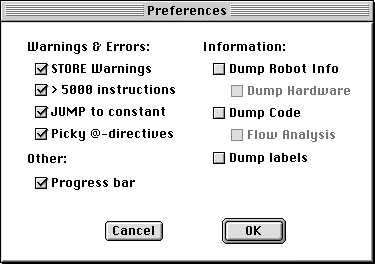
The Preferences Dialog gives you complete and unquestioned authority over the assembler.
- STORE Warnings
You can turn the warnings off by default with this button. - > 5000 instructions.
Turning this off will suppress warnings notifying you that your robot has exceeded 5000 instructions. - JUMP to constant
If this is on, the assembler will warn you when you write a constant before ajumpinstruction or a macro that expands to a constant before ajumpinstruction. - Picky @-Directives
Will issue a warning if the arguments passed to an @-directive are not numbers or label references. ie,a a' @-will raise a warning. - Dump labels
If this is on, a list of labels and their addresses will be dumped to the warnings window. - Dump Robot Info
If this is on, a few statistics about the robot will be printed to the warnings window. - Dump Hardware
If this is on, then when RWasm prints a robot's info it will also print the robot's hardware information. - Dump Code
If this is on, a description of every command assembled by the assembler will be dumped to the warnings window. Seriously slows down assembling. - Flow Analysis
If this is on RWasm will generate a file, robot's name.flow, in the same directory as the robot, which contains data that can be used by RWinfo, a flow analysis tool. RWinfo isn't available yet, so you might want to leave this off. - Progress Bar
The assembler is usually too fast to need a progress bar. If your computer is very old, or your robot is very big/complex, and you spend a small eternity waiting for the assembler to finish, then you might want to turn this on to reassure you that your computer isn't frozen. (:
Renaming Registers
The #!!rename directive will allow you to
create an alias name for any register. This is intended to make your code
a little more readable. So, rather than using a' to hold the
approach speed of the enemy, you can use approach' once you
have written #!!rename a approach.
If you want to get fancy, you could instead write
#!!rename a \
   approach
Macros: How to
A macro is simply an abbreviation for other instructions. For example,
you might have a macro named wallabe and it expands into
aim' store. I don't know why anyone would name it
wallabe, but someone did. And now it saves you some typing!
So, to use a macro, you need to define it. Let's say you want to define
a constant called delta. Simply write
#!!macro delta 60and now you can write delta all over your code rather than
60,
so it would be simple to change in one swoop. However, you might also need
a negative, and since in Robowar you need to conserve every clock cycle you
can, writing delta chs would be out of the question. However,
there is also a second type of macro which may come in handy here, called an
@-directive. These are nice because they allow you to have the assembler
evaluate an expression for you. So, if you write delta @chs
the assembler will turn that mess into "-60". You can also use these
directives in macros.
#!!macro -delta delta @chsNow you have defined both
delta and -delta. Also,
changing the value of delta automatically changes the value of
-delta.
I might also point out that the @-directives in a macro are evaluated when the macro is expanded. So
#!!macro twice @dup
1 a' 1 a' sto twice
will work as expected.
You can use any combination of @-directives and tokens within a macro.
Another useful fact about macros is that they retain their context. This means that whatever settings there are when the macro is defined are used when the macro is expanded. So
#!!noStoWarnings
#!!macro sto! store
#!!stoWarnings
will define a macro named
sto! that will never generate a
STORE warning, regardless of the assembler settings.
#!!stoWarnings
1 a' nop sto  #gives a warning
1 a' nop sto! #gives no warning
@-directives
An @-directive is merely a robotalk command that can be evaluated when the robot is assembled.
Supported @-directives
@+ | Adds the two previous commands |
@- | Subtracts the two previous commands |
@* | Multiplies the two previous commands |
@/ | Divides the two previous commands |
@mod | MOD's the two previous commands |
@chs | Negates the previous command |
@abs | Replaces a command with its absolute value |
@and | AND's the two previous commands |
@or | OR's the two previous commands |
@not | NOT's the previous command |
@xor | XOR's the two previous commands |
@swap | Swaps the two previous commands |
@drop | Drops the previous command |
@dup | Duplicates the previous command |
@@ | Pushes the current address onto the stack Equivalent to label: label
|
@dupn | Duplicates the last n instructions |
@dropn | Drops n items from the stack |
@roll | Rolls an instruction n commands back |
@pull | Equivalent of using @roll with a negative value |
Using the Dump Code Option
When Dump Code is enabled in the options dialog, RWasm will print a description of each number/register/command that is finally assembled into your robot. The readout looks rather intimidating at first, but it's pretty straightforward. Here's an example:
The Robotalk code from KISS

main:
    aim 97 + aim' sto
main2:
    50 shield' sto
    range not main ifg
    7 missile' sto  #<--would suck without NNE
    robots 2 > main main2 ifeg

Generates the following output.

 V     0   aim                  aim                  Line    4
 C     1   recall               aim                  Line    4
 N     2   97                   97                   Line    4
 C     3   +                    +                    Line    4
 Q     4   aim                  aim'                 Line    4
 C     5   store                sto                  Line    4
 N     6   50                   50                   Line    6
 Q     7   shield               shield'              Line    6
 C     8   store                sto                  Line    6
 V     9   range                range                Line    7
 C    10   recall               range                Line    7
 C    11   not                  not                  Line    7
 R    12   0                    main                 Line    7 selected
 C    13   ifg                  ifg                  Line    7
 N    14   7                    7                    Line    8
 Q    15   missile              missile'             Line    8
 C    16   store                sto                  Line    8
 V    17   robots               robots               Line    9
 C    18   recall               robots               Line    9
 N    19   2                    2                    Line    9
 C    20   >                    >                    Line    9
 R    21   0                    main                 Line    9
 R    22   6                    main2                Line    9
 C    23   ifeg                 ifeg                 Line    9
The first column indicates the type of the token: V = register,
C = command, N = number, Q = quoted register, R = label reference. The
second column is the address of the command. The third column is the
actual opcode that will appear in the debugger. The fourth column is
the text that generated that opcode. Finally, the line number in the
robot's code is displayed. Additionally, if some commands are
selected, then RWasm will print selected after the line
number next to each selected command.
The second and third columns can be considered the "Debug View" since that's pretty much what you'll see in the debugger. If your robot uses renamed registers, the opcode field will display the origonal name of the register, but the text field will display the new name. If your robot uses macros then the macro name will be displayed in the text column, but the expansion will appear as it should in the opcode column. If you use nested macros, only the name of the macro written directly in the code will be displayed even though all the nested macros are called. This is intentional.