“WarEngine” is a program used for fights between programs commanding robots moving on virtual battlefields. It was created because of my fascination with Core Wars and because I wanted to explain to my son what programming is about. My intention was to create a complete environment that enables writing, compiling and testing a warrior-program, to allow arranging fights between programs with at least minimal ability to watch the course of fight in real time and in retrospect (logs). Originally I intended to write this program for myself. After some time, however, the program exceeded a “critical mass”, I decided to share it with others. From then on, I have adopted an additional guideline – maximum broadening (not increasing!) the complexity level – so that the “very beginners” could try their skills (the first beta-tester was my 9 year old son) but also the “pros” had something to rack their brains about. In what extent I have managed to succeed – the opinion is yours. I would appreciate any remarks and opinions. Please send your comments to me at: kmk2@hoga.pl – please, though, bear in mind the following.
WarEngine" is not a commercial program. I am developing it in my past time among other activities and that’s why some elements have been simplified to minimum in favor of developing other. If there are people willing to use the program, I will develop it further, though I will not be able to fulfill all wishes. I invite you to visit the “WarEngine!” site www.warengine.prv.pl – there you will find updates (bookmark PROGRAM), FAQ and “warriors” sent (I hope) by you.
"WarEngine!" there also is a ready-to-start internet server, allowing to upload the programs, current review of battle status and rankings directly through www, and receiving the results by e-mail. The server is ready and tested – it has handled 8000 “warrior” programs fighting on over 100 maps. I am now looking for possibility of setting it online (i.e. a sponsor).
The program “WarEngine” together with this document is a freeware. It can be copied and spread without any restrictions, providing that it will not be modified and the info about the author is not deleted. The program and all the solutions it used are copyrighted. I am not responsible for any damage caused by the program in the
user’s resources. I state that that the program does not contain any intentionally implemented procedures harming the user in any way. It is not, however, possible to test the program on all the platforms and configurations of hardware and software, and it may, especially in beta version, cause accidental system crashes and other undesirable computer behavior. Reported defects will be fixed if possible.
Install the program by unpacking the downloaded file into a folder/directory (other than the root directory), so that subdirectories are also created. If you use the DOS program arj, the unpacking command will be as follows: “arj x wareng m”. The windows based packers should do it automatically. If you encounter any problems with installation, ask someone more experienced – I am not able to describe a procedure, which is correct for EVERY configuration of software and hardware.
Hardware requirements: for DOS, any computer starting from a 486/16MB RAM/VGA will be enough. For Windows 95/98 any computer that can handle the Windows, should also be enough to run the WarEngine. If needed, I can generate a “Lite” version with less maps and programs and lower system requirements...
Operating system: DOS 5.0 or higher, Windows 95/98 (the program must be run in a full window). With Windows 2000 and NT, the program either runs unstable, or does not run at all – maybe some of you can help me diagnose the problem – I have received various messages from different users, so the problem is probably solvable. I am waiting for further info.
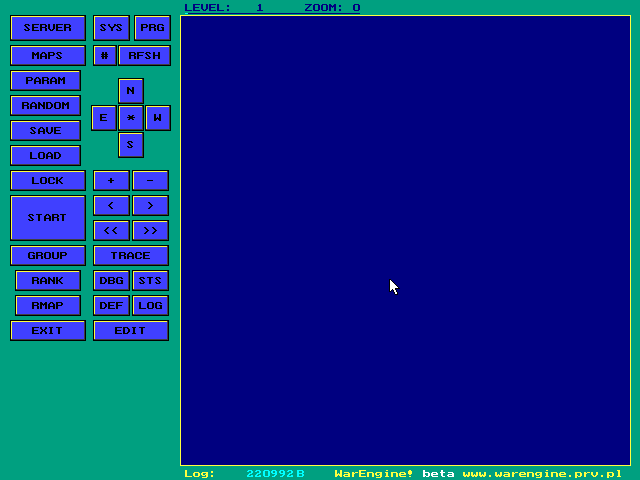
The program is started with command wareng_m.exe. If it has been properly installed (i.e. all the files are where they should be), the main screen appears: There we can create a battlefield and run our warriors. However, in order to start a fight, we first must create a warrior, so now I am going to describe the button EDIT.
Description for the very beginners – if you know what a programmer’s editor looks like and know how to use it, skip this part and proceed to the point “the first program”.
Using your mouse, press the button “EDIT”. Yes, that’s the editor we’re gonna use to create our warriors. It is a “minimum” version, though it has everything you need to write programs. All options are grouped in the upper taskbar. You can enter it by pressing the key F10, or by clicking with your mouse. Now, a short description of the options available in the menu:
| Menu FILE | ||
| New | Creates a new empty file, where you can write your program. Just remember that if you don’t save it before quitting the editor – it will disappear! | |
| Open | Opens a previously saved file. By default it shows all the files with extension “*.prg” – gathered in the same directory, where WarEngine was run. | |
| Save | Saves the edited file. If the file had been created with the command “New”, the editor will first ask for the name of the file. It is important to end the name with “.prg”. | |
| Save as | Allows to save the edited file under a name different than the original name (useful if you create a new, better version of your program – start with saving the file under a new name, thus leaving the old, already tried version unchanged and modifying the new file). | |
| Save all | Saves all open files. | |
| Change dir | Changes the current directory – the one, from which your programs are loaded and where they are saved. | |
| DOS Shell | Exit to the command prompt – return to the editor by typing “exit”. | |
| Exit | Exit from the editor to the main screen. | |
| Menu EDIT | ||
| Undo | Undo the last operation. | |
| Cut | Cuts the selected fragment and stores it in the memory – the fragment is selected by setting the cursor at its beginning and, while holding the shift key, moving the cursor to the end of the fragment to be selected. | |
| Copy | Copies the selected fragment and stores it in the memory (without deleting it). | |
| Paste | Pastes the previously stored fragment in the place indicated by cursor. | |
| Clear | Deletes (without storing) the selected fragment. | |
| Menu SEARCH | ||
| Find | Finds a word in the text (beginning from the place the cursor is placed). With the down arrow, you can call words searched previously. | |
| Replace | Allows replacing (beginning from the place the cursor is placed) the word in the upper line with the word in the line below. | |
| Search again | No comment :) | |
| Menu COMPILE | ||
| Compile program | Compiles the program written. From a file prg it creates a file dat – a warrior you can place on the map. | |
Too much to remember at once? For writing your first program only few of those options will be needed. Furthermore, the most commonly used options have shortcut commands (some of them are displayed on the lower bar). The most common ones are: Alt-F3 (close the window), F6 (switch to another window).
1. Enter the editor
2. "New" - opens a new window
3. Write the following in the window:
program 'MyProgram'
begin
move
rright
end
4. Save the program by pressing "Save" or F2. A window will appear, where you have to enter the name – enter “test.prg”. IMPORTANT! The program will process the saved file. If you don’t save before the compilation, a “not found” message will appear or the program will compile the last saved version!
5. Press Ctrl-F9, or choose the option "Compile program".
If you did everything well – an EMPTY window, called “myprogram.err” will appear. It contains a list of errors encountered during the compilation. If the list is empty – all is O.K. You have just created your first warrior – what do we do with it – will be described in the environment description.
Now, close window myprogram.err (Alt-F3) – underneath you will find a “technical” window with info about the compilation. If the compilation was successful, there will appear info about the length of the program. It might be useful, as the maximum size of the program-warrior is 3967 bytes. Rest of the info in this window is for the advanced users and for me – it allows monitoring the compilation.
Close this window too, now Alt-X or “Exit” – and let’s learn something about the battle environment.
This is the main screen of the WarEngine. The button “EDIT” has already been described. Now, I’ll describe remaining options in the order as they are needed for creating your first battle:
| Mouse | |
| right button | Setting or removing the warrior from the map. ONLY when ZOOM is set to 1 or 2. When setting the warrior, the name of last compiled program is displayed. |
| left button | Selecting a robot / edition of the field. After pressing and holding the cursor on the map, it is possible to change the direction the robot is facing, or edition of the field. Description of icons in a “pop up” window. |
| PARAM | Map parameters – closing the window after entering the last value causes generation of a new map of a requested size (from 8x8 to 128x128). Parameters above the field “SIZE” defin the density of various map elements. Parameters below generally apply to the server and are still in a test phase. A “normal” user might find the following parameter interesting: “min.ob”, which defines the minimum level, below which some “cannon fodder” will be added to the map. It will be loaded from the directory LOADM_XXX_M, where XXX is the map number. It allows for continuous testing, with “fresh” delivery of enemies. |
| RANDOM | Re-generates the map. Parameters remain the same, but the map is different. |
| SAVE | Saves the map (it must be paused!) – together with all the warriors on it. Programs are paused when the button “START” is unpressed and are saved together all the status data, variables etc. Re-loading the map and un-pausing will cause the game to resume as it it were paused for just a moment! |
| LOAD | Loads the map (and all the objects). |
| LOCK | Prevents the accidental deletion of the map during the game. Inhibits the SAVE and RANDOM commands. |
| START | Starts all the objects on the map (pause by depressing the button). |
| MAPS | Does all the basic operations (save, load, start, stop…) for all maps simultaneously. |
| GROUP | Defining the ranking groups. A server option. |
| "+" & "-" | ZOOM |
| "<" i ">" | These buttons allow switching between maps. The program allows simultaneous gameplay on several maps (levels). In the basic version it is 8, on the server there may be up to 128 – the number of maps available is shown after pressing the button “SYS” (resources), in the line “MAXMAP”. |
| "<<";">>" | As above, but scrolls 10 maps at once. In this case – moves to the first or last map. |
| # | >Grid on / off. |
| RFSH | Redraws (refreshes) the map. |
| "N" "S" "W" "E" | Scrolls the map by 1 field in the specified direction (by 10 fields if the key “*” is pressed). |
| TRACE | >Step by step mode. After pressing this button, the command program of the selected robot is executed step by step (each step after pressing <space>). Remember to select the tested robot before. This option comes handy when you want to check what your robot really does. |
| STS | The warrior status. More info below. |
| DBG | Debugger. Together with the step by step mode allows for detailed analysis of the warrior-program behavior. |
| LOG | The battle log for the selected warrior – available only for maps with “1” entered in the parameter "log.ob". Detail level is currently being tested. |
| DEF | Actually command reference (from complilator table). |
| RMAP | Map ranking – allows continuous monitoring of the battle results with respect to a chosen classification List of objects on the map together with (in the following order): hits sustained, hits scored, enemies destroyed and score. May be sorted by above, using the keys 1..4. Bars show the energy level (blue), damage level (red) and temperature (yellow). Quit by pressing “Esc”. |
| RANK | Same as above, but for all maps. |
| SYS | Resources: memory available, number of maps available, max and actual number of programs... A technical option. |
| PRG | Monitoring of the programs table. Technical option. |
| SERVER | Activation of communication with PHP scripts. Only for server version. |
| END | Leave program. |
After selecting a warrior and pressing the “STS” button, continuous monitoring of a selected warrior is available. Below – a description of the info displayed in the window:
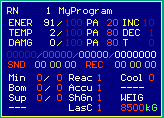
This window may be very useful, especially in the step by step mode. Allows to determine whether the program behaves the way we’d like it to behave. For the time being, it is a “minimum” version, which I have used for testing the WarEngine, not showing too much. Having, however, the file ???.lnk, created during compilation and containing addresses of commands, it is possible to trace the dubious places.
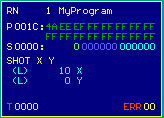
01 = arithmetic preprocesor fault (result may be incorrect)
02 = parameters preprocesor fault (result may be incorrect)
FE = stack overflow - cannot write the stack
FF = stack exhaustion - cannot read the stack
Time acceleration – Ctrl-T: this command allows “boosting” the clock commanding the game. Generally, any value between 1 and 99 can be entered. It has to be done carefully though, as overloading the program engine may cause a crash of the program or even of the system. Although this function has a protection preventing “boosting” if the expected load exceeds 50% it does not always work. The maximum allowed value depends on the computer and on the number of warriors running. It has to be determined individually.
Robot tracking - Ctrl-S: this function allows to see the path of the robot without long observations of the battlefield. It is useful to check if the robot does not “loop” somewhere… The function is active only when ZOOM=1 and works in the browser layer, i.e.the track is displayed on the screen, not on the map. Refreshing the view causes loss of information. Additionally, this restrict the maximum tracked area to 64x64. Nevertheless, this is a very useful function anyway.
O.K., enough for this short description. For further details I invite you to read the part “Commands”. For those, who don’t find this description enough, a part “Programs” is being created.